The Rosary Shop
Supporting the life of prayer since 1996 with custom handmade rosaries, rosary kits, supplies, kneelers and prayer books.
This page is no longer monitored, and is here for information only. To order a custom rosepetal rosary or rosary repair, see the home page.
Building my first Cedar Strip Canoe

A couple years ago I took my two oldest children to nearby Hagg lake for their first fishing trip. They were bored after about 30 minutes, so we walked over to a little hut and rented a canoe. I like to try my hand at something different from time to time and, recalling how much my children enjoyed the boating (and not the fishing), I turned my attention to making a cedar strip canoe in the late summer of 2007. There are certainly boats that are simpler, less expensive, or faster to build -- the myriad of small plywood designs comes to mind, two of which I made with my grandfather almost 30 years ago -- but it seemed like the right choice for our family. Though some steps of construction are tedious, a nice thing about many boats, and canoes in particular, is that they combine artistry, woodworking, and some interesting design problems.
The strip-style canoe is a relatively-modern approach to canoe-making. Making boats from strips isn't new, but making them from 80-or-so 3/4 inch strips only appears to have taken on any popularity in the last 40 years or so. The results can be nice looking, relatively-durable, precise and very functional. Other methods include hewing and burning the canoe from a single log; bark, skins or canvas over ribs; and metal or synthetic materials. In fact, the strip canoe is basically a synthetic material canoe, but with wood in the laminations -- it has fiberglass/epoxy laminations inside and out. For those who get all excited about natural resources, it also uses "less tree" than many methods, and the materials that are used are rapid growing softwoods. In fact, I think the whole project has consumed about 63 board feet. A single red cedar tree trunk generally contains between 200 and 5000 board feet, depending on size -- as much as a hundred times that used by a typical strip canoe.
I've tried to provide a significant amount of detail here, especially in regard to problem areas and pivotal decisions, in hopes that the information can assist others who are considering building a canoe or similar project. Some of the areas are a bit subjective; if you have a suggestion or alternative method, let me know and I'll be glad to mention it. Something to recognize at the beginning is that there are areas where precision is very, very important, and areas where it really doesn't matter and its pursuit is a waste of time. For example, having uniformly machined strips, making sure they are seated together well and close to the form curvature is important and will save a lot of frustration later. But working on getting the overall length to within a 16th of an inch of the design is a waste of time; no one is going to notice or care.
In choosing a canoe to buy or build, first consider its intended use. I was looking for a design that could hold me and my wife, along with several of the kids (or just me and some kids) all at the same time, and maybe be good for a camping trip. No rapids or whitewater. Just lakes and gentle rivers. This means I need about 500 pounds capacity, fair stability (for the kids) and little rocker. Then one chooses a design or model that fits the desired. In this case, after evaluating a variety of designs and companies, I purchased the design plans from Green Valley Boat Works (Canada). It is 17'6" long. They call it a "Winisk," designed by John Winters. I liked their designs, the online information they provided, and was impressed with the speed with which they replied to my pre-sales inquiries.
Canoes have a variety of design parameters, one of which is the end-to-end symmetry. Most less expensive canoes are symmetrical; you could cut them in half across the middle and wouldn't be able to tell the stern from the bow. Assymetrical designs like the Winisk are shaped differently and tend to move more efficiently in one direction -- hopefully forward. They are usually a little more narrow in the front, for example.
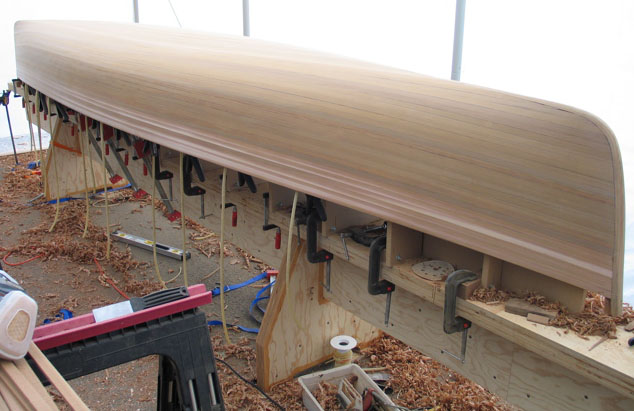
The plans are basically real-size drawings of cross-sectional segments with a bunch of additional (and helpful) notes and suggestions. These shapes represent and become the mold for the hull at one foot increments. There is nothing magic about the form spacing; some small boat designers use two foot or other spacing, for example. Closer spacing is helpful in areas where there are tight twists or curves. In any event, you copy the drawings onto wood sheets -- I used sewing pattern transfer paper to copy the lines onto 3/4 inch MDF -- and then cut them out with a jigsaw. Attach these wood patterns (also called forms or stations) to a firm, level base of some kind. The base is called a strongback in some circles, and looks like a long bench. Once your strongback is made, make it as straight and level as possible. I detected a little twist in mine, and so applied clamps to counteract it. I made one edge as straight as possible so that it could act as an alignment reference for the upcoming forms, but the same result could be achieved by "snapping" a chalk line down the middle.
The MDF forms are attached to squared hardwood blocks using nuts and bolts, and the blocks are clamped to the strongback. Make sure that the forms are all smooth, level and properly spaced and aligned with each other. I marked lines at one-foot intervals on the strongback; the faces of the forms are aligned with these lines. A file and sanding block can quickly smooth out any irregularities in the edges of the forms. In one case, I cut too far when cutting out the form and had to build it back up using a putty wood filler. Because the strongback is straight and level, I used it as a reference to check the depth of the forms, measuring from the surface of the strongback to the centerline on the forms to make sure they are in the correct position. Once the edges are ready and everything is aligned, apply tape to the edges of the forms to prevent them from gluing to and damaging your canoe's interior; at first I was tempted to use wax, then realized that it might interfere with the epoxy to be applied later.

The horizontal lines on the forms are the theoretical waterline. Some people begin by installing strips parallel to this line. Others just start at the sheer line and build from there. The vertical lines are the centerline -- useful for aligning the forms and establishing the meeting lines for the bottom strips later on. It could help to elevate the forms another inch or two more from the strongback. It sometimes seemed a little tight or awkward at the ends during assembly and fiberglassing.
Steamer: You can make a steamer using a camping stove, large pot with a lid, some simple fittings, flexible metal pipe, and 4" diameter PVC or ABS pipe (don't seal it up tight, or you will be making a very dangerous steam bomb). The hot plates sold at common retail stores do not provide enough heat to generate sufficient steam. You need either a gas source or a commercial hot plate. Drill holes through the 4" pipe and insert suspension wires so that the boards aren't resting in a pool of water. I used end caps to retain some steam; these were drilled for safety. |
Many strip canoes have hardwood stems on the ends to which the upcoming cedar strips are attached. I used teak for my hardwood trim pieces, including the stems. Yes, teak is heavy, but it is basically water and weatherproof, and I like how it looks with the cedar; most makers recommend ash and lighter hardwoods. The bend is too sharp for a hardwood (and most softwoods) to make unaided, so I steamed several 1/4 inch strips of teak, and bent them around the end forms using C-clamps. It is helpful to have at least one extra sacrificial strip on the outside of this bend, as the outermost strip tends to tear out and get damaged by the C-clamps. Once the pieces cool and dry, they are then glued together and re-clamped, creating a laminated stem. Some people recommend just using a heat gun instead of steam; I didn't try it, but did see pictures of some pretty sharp bends made in individual strips with hot air only. I don't know how well it would work if attempting to bend multiple strips at the same time.
Speaking of clamps: I decided to make the canoe myself after seeing how much it would cost to buy one. The materials for a strip canoe are in the same range of a decent, new synthetic canoe... if you don't count the tools, forms and other building aids. If cost is an important factor, and you don't already have most of the accessory tools and supplies, you may be better off if you just go out and purchase a finished canoe direct from a professional maker, a retail store, or secondhand. My general materials costs came out approximately as follows (including shipping):
| Cedar and Trim Wood | $200 |
| Epoxy and Varnish | $320 |
| Fiberglass | $100 |
| Disposable Supplies | $50 |
| Strongback Lumber | $120 |
| Plans | $100 |
| Forms Lumber | $80 |
| Paddle Lumber | $40 |
| Total Materials | $1010 |
The strongback can be reused for other projects. The forms and plans have no future utility unless you plan to make another canoe of the same design (and some designers of commercial plans will ask you not to do this without paying for another set of plans). About $900 gets "consumed" by the boat, more if mistakes are made along the way. Though this is about the retail cost of common synthetic canoes available at outdoor/sporting good stores, it isn't a lot compared to the $3000 - $8000 various makers ask for a handmade cedar canoe (there are a lot of offerings in the $3000 - $4500 range). You can also acquire everything as a kit (less the strongback) for about twice the cost of the raw materials. Personally, unless you just have a lot of free time, I think it makes sense to purchase the forms pre-made; I believe they usually run around $200. But if you have the tooling to make the strips and a good source for lumber, you can save some serious money by making them yourself.
Other things like the car rack, life jackets, lines, etc. are going to add another $200-$400. And then there is beer, of course.
Some talk as if making a cedar strip canoe requires hardly any tools and anyone can do it. I beg to differ. Anyone can replace a radiator too; but having experience, skill and the right tools are the difference between a half-hour job done right the first time, and three days of torture, frustration, and an eventual tow to the nearby shop to complete a botched attempt. Experience, skill and the right tools (and a little luck) can make anything look easy. Considerable time, space, tooling and patience are all necessary to complete a strip canoe; the skills are similar to, but not exactly the same as, basic hardwood furniture construction. Similar principles apply. The truth is that, since starting this, many more people told me stories about half finished disappointments than completed seaworthy beauties. Getting a kit can save some time and avoid some initial fabrication problems for a price, but even if you are building from prefabricated strips, you may still need at least the following tools and supplies (in addition to the above):
- Wood steaming setup (if making stems)
- Mid-size hand plane
- Bubble level
- Carpenters squares of various sizes
- 25' tape measure
- Hack saw (and a jig saw, if you have one)
- Yardstick and steel ruler
- Rubber mallet ("the pursuader")
- Tacks or staples and staple gun
- Sanding block and 60, 100 and 150 grit sandpaper (or similar). A random orbital sander is a big time saver. Avoid belt sanders unless you have a very light hand.
- Nuts and bolts to attach forms to strongback
- Masking or painters tape
- High quality respirator and face mask -- not the paper mask garbage that basically does nothing but filter out the large particles that your body could have dealt with anyway. (This alone is easily $100+)
- A couple portable light stands if you are working in a poorly lit area or outside at night
- Ear protection (if using power tools)
- As many as 80 or so clamps; I used ~40 spring clamps and ~40 small 4" bar clamps. Towards the end it would have been nice to have 15-20 more of each.
- Power grinder/cutoff tool is a good help on the interior, as is a spoon plane.
- 1/2 - 3/4 wide hand chisel
- Scissors and razor knife
- Various scrapers and putty knives (always handy for something)
- A few plastic mixing bowls, stir sticks, and a bunch of nitril or latex gloves
- Plastic squeegees, rollers, brushes, etc.
- Six or so 12+ foot band clamps and ~100 feet of large latex rubber hose (if attempting a stapleless assembly)
- Some trashable shirts, pants and shoes to wear while applying epoxy
- Table saw or portable circular saw
- A shooting plane can help create a reference edge on your strongback, or you can use a taut chalk line
- Hand drill (and maybe a drill press, depending on what you try)
If you will be fabricating your own raw parts, then the following tools are needed:
- Band saw (you can use a table saw if you don't mind losing about one third of your wood to the sawblade kerf)
- Table mounted router or shaper
- Thickness planer
- Drum sander (can really help speed up some steps)
In addition to your machining space, you need a clear, sheltered, dry, level space at least 10' x 20' for canoe assembly; the larger, the better. And you need a good 40' clear path to make the strips. In other words, this is a much larger project than it may appear to be at first.
But back to the stems: Some designs have no stems, and the wood strips overlap and glue to each other at the ends. Some have only an inner stem, to which the ends of the strips attach. Some have an inner and an outer stem, where the outer stem acts as a strengthening end cap to the boat. I made the Winisk with the inner and outer stems. I think, though, that the inner stem design should be altered so that it flares out and is slightly longer than the outer stem along the keel line. As it is designed, its interior end is a focal point for routine and impact stress, and there is not much mechanical strength at that point; there is little more than a butt joint between the cedar strips and the stem as it approaches the end, held together, effectively, by the epoxy and fiberglass laminations. By lengthening and flaring it, the strips have more material to grab and hold onto at that stress point. Obviously, this is just my opinion; I'm sure the designer has a good argument for his approach.
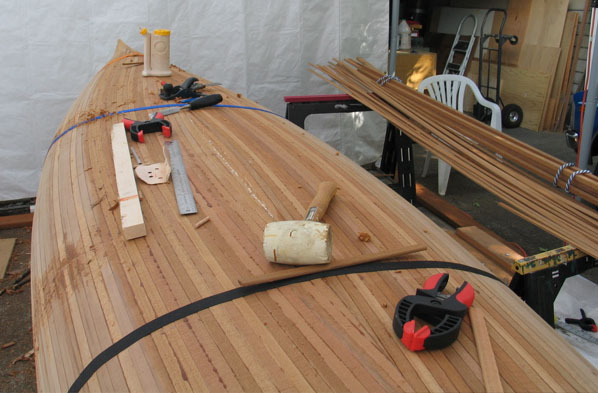
The inner stem needs to be beveled to match the angle of incoming cedar strips. I roughed the bevel in advance with a small hand plane, then finalized the angle with the inner stem mounted in position on the forms. To do this I used a straight hardwood stick about 2 inches wide, an inch thick, and 16 inches long with sandpaper wrapped tightly around one end. Use the stick as a sanding block against the stem, doing a few inches at a time, installing cedar strips, sanding a few more inches, etc. Keep one end against the nearest form and the sandpapered end against the stem, and the entire stick oriented in the same direction as the upcoming cedar strips.
I already had all of the needed major tools, and a lot of large clamps that are good for furniture making, but not for boat work. I also have accounts with hardwood suppliers, so that end was covered. I didn't want to have to scarf-joint together a bunch of cedar strips, so I sought 18' clear cedar boards, but even in "clear cedar," only about one in ten boards was clear enough to work. Though knots can be acceptable and attractive in fine furniture, they create unacceptable weak points in long strips that have to bend and twist. Any strip or rail with a knot in it is usually scrap. This means going through a retail store that allows you to pick through the lumber, paying a premium for prefabricated strips from kit supplier (perhaps $1000 or more for 80 18' strips with shipping), or overbuying in hopes that you'll get a decent number of clean boards. Anyway, after a lot of sorting, I took home seven 1 x 6 x 18' cedar boards.
The project also required the purchase of about 80 additional assorted small clamps -- about half of which were less expensive spring clamps. But it does add up. I don't have room in my shop for the tools and the canoe, so the canoe was built just in front of my garage under a temporary tent (until some local city personnel freaked out).
The strips go together well if they've been machined with a 1/4 to 3/8 diameter bead on one edge and matching cove on the other, the current convention. There is no perfect solution here, but the 3/8 bead and cove seems to be a good middle ground. The more uniform your strips, the tighter you can fit them together and to the curvature of the forms, the better the whole project will go. Fabricating the strips took one pass through the bandsaw, and two passes through the router per strip. That all adds up to about 250 passes for one canoe. Yuck. I don't care for repetitive, mindless, time-consuming tasks (yes, I know that these make up most of one's life). If I make more canoes, I'm planning on making a bandsaw attachment that will complete a precise strip in one pass.
Glue vs. Epoxy: Epoxy and similar chemicals are the obvious choices for fiberglass lamination, but for general construction they aren't the only or even the best options. If you have a smooth, tight, wood-to-wood mating surface and can apply good pressure to the joint, common wood glue (PVA) has strength similar to and is easier to work with than epoxy. However, wood glue has very little structural strength. That is, though it can bond two close surfaces together well, it does not have much strength in and of itself -- it isn't good for irregular joints or gaps where strength may be critical. Also, epoxy requires little or no clamping pressure; in fact, too much clamping pressure can be a bad thing especially with epoxy. But when properly applied, either adhesive can create a joint that exceeds the strength of the surrounding wood. Being used to working with wood glues, I'm used to short clamp times and having joints be able to take a little stress within an hour of assembly. I got surprised more than once on this project when epoxied joints began to pull apart under the slightest stress, even after setting for a several hours. But once completely cured, they seemed stronger than similar wood glue joints, are more resistant to water, and have good gap-filling properties. Also, many epoxies can be applied in temperatures approaching freezing whereas wood glue loses effectiveness under about 60 degrees. For some areas like the stem laminations and the biscuit joint to bookmatch the endcaps I used urethane glue. Choosing Epoxy: I don't have much personal experience using or testing various epoxies. I went with System 3 because independent third parties had done extensive real weather testing with it and several other marine epoxies. It wasn't necessarily the best in every category -- each epoxy has its own strength or weakness -- but overall, System 3 tended to do equal or better than most others that he tested. There are less expensive options that I might try next time. |
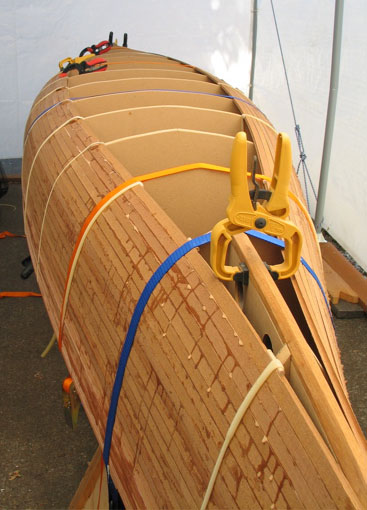
With the inner stems in place on the forms, begin gluing the prepared strips to each other and the stems. Some makers include accent strips and designs of various colors using different woods or by applying stains before fiberglassing. I made no attempt to book match the colors from one side to the other, but did try to keep like-colored boards close together. This goes a lot faster if you use staples, but as an experienced woodworker used to making very nice pieces, I just can't bring myself to put staples into a visible face; that's just not right! The stapleless method is painfully slow, but using a combination of latex hose and band clamps I was able to glue about four strips at a time without any staples. The band clamps keep the strips tight to the curvature of the forms, and the latex bands provide the edge pressure between the strips; the substantial inconvenience of this method is it requires additional space in front of the canoe to thread strips in under the band clamps.

The latex hoses are tied to one jaw of a spring clamp; the clamp can be attached anywhere along the bottom edge of the forms, allowing for easy adjustment of pressure amplitude and direction. Thread four strips into place. Pull a few of the latex bands lightly over the strips (with a 1/4" dowel in the cove to protect the edge) and grab the loose end with the other jaw of the spring clamp. Squeeze glue into the meeting lines. Pull the remaining bands over and tighten all bands. Wear eye protection when working with these; more than one slipped while tightening and nailed me in the face. I didn't think of using the band clamps until about half way into stripping; the result is that my initial strips didn't follow the curvature of the forms as closely as I'd have liked. Groups tended to cup slightly. Once the glue sets, release the latex bands and glue up the next set.
I didn't mind being generous (sloppy) with the glue, because wood glue is cheap and I have decent tools for knocking it off later; actually a putty knife or hand plane each work great (and the latter is a necessity for rapid fairing of the outside hull). Common scrapers used for hardwood work are not useful here, because the soft cedar just tears out. I did put tacks in the sheerline strips, since those would be covered by rails, anyway.
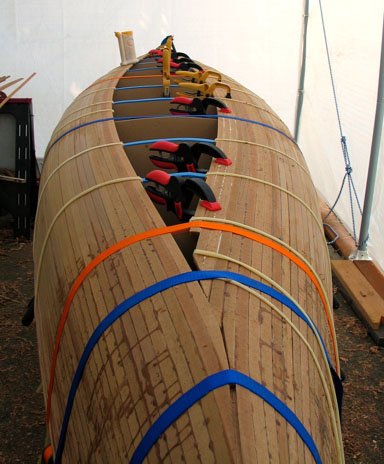
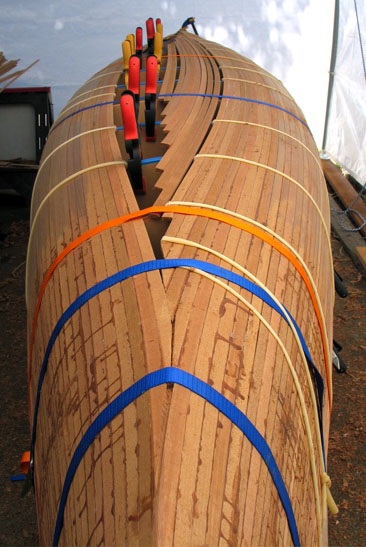
Gluing the strips went rapidly until I reached the bilge area, where there is a significant twist in the boards. You can see in the first image, below, that the latest strip starts out almost vertical at the stem, twists to almost horizontal in the middle, and then back to vertical at the other end. The latex hose is not strong enough to support that kind of twisting; it became difficult to do more than one or two strips at a time until I rounded the bend. Set it, glue it, clamp it into place, wait for the glue to set up enough to hold the twist, etc.
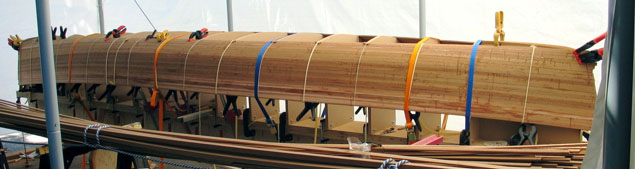
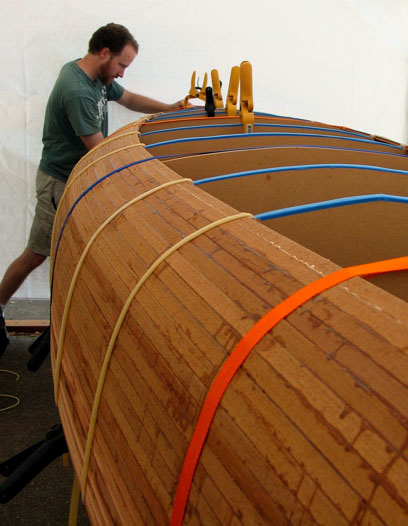
Once you make it "around the bend," filling in one side of the bottom went quickly. Glue the boards in to overlap the center line (marked on the forms at the beginning). Once one side is complete, cut them back flush with the center line. Then begin installing the boards on the other side. This is much more tedious since each piece must be hand-fit, one at a time, to the boards already installed. This obviously isn't the only way to fill in the floor. I've seen some real creative approaches but wanted to keep it simple for my first go.
Lost some pictures, here, of the strips all installed on one side and trimmed to the centerline.
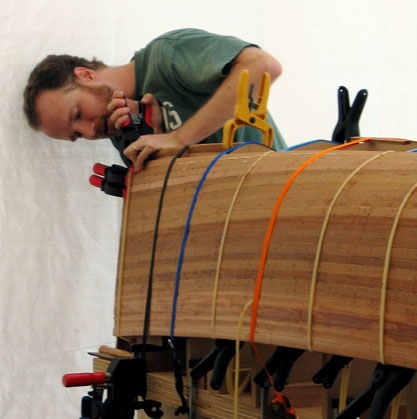
Strip installation becomes increasingly-frustrating (and profanity-laden) as you approach the final few strips. The last two or three boards were quite difficult to put in; I had to dig pretty deep into my bag of tricks to make it work out nicely. In this case, using a razor knife, I cut half of the concave groove from the last installed strip, pressed the final strips into place, tapped it a few times with a soft-face mallet, then glued the removed edge back in. Now, with the fiberglass and epoxy over it, you can't tell how it was done. No doubt the pro-builders have better approaches.
I then attached the outer stems, planed and sanded the outside, and applied a sealer/filler coat of epoxy. Cedar dust was generously mixed in this first coat so as to fill any minor cracks between the strips. You and any helpers should be wearing a full face respirator any time you are sanding cedar or epoxy and should keep it on for a considerable time afterward, at least until the air in the room has completely changed several times over! For this and other reasons it is often easiest to do all major sanding outside.
Fiberglassing: It is very important that the fiberglass sheet be taut, smooth, and in good contact with the surface of the boat. My primary mistake has been not having the sheet pulled taut; this is most difficult when doing the inside due to the concave shape. Also, start in the middle and always brush/roll/squeegie outward and toward the ends. That pushes excess fabric out and away from the middle. Otherwise, you'll end up with wrinkles and ripples. Unevenness in the fabric tension creates areas where the epoxy can collect and lift the fabric slightly relative to the surrounding plane. This isn't immediately evident while squeegeeing out, and happens slowly over the following hours. Also, don't use any more epoxy than is absolutely necessary; any excess is just going to cause problems (and make more sanding) for the final finish. I used System Three silvertip laminating epoxy with slow hardener for most applications. You can also use the fast hardener if you don't wait too long (more than a few hours) between applications. With the slow hardener I was able to wait up to 1-2 days between applications if necessary without requiring any sanding. Pour it on and spread it generously. Then squeegee it out once it begins to gel. Either hardener gave me about 30 minutes of working time before beginning to stiffen (that was at about 70 degrees). A clean squeegee is best for the initial application; later applications go faster with a roller (the roller will stick to, pick up and carry the cloth if used on the first coat). Some have suggested using a thinner epoxy like System Three ClearCoat for the first application. Also, when using a roller, make sure it is a lintless foam roller. I made the mistake on my first fill-coat attempt of using a common paint roller, which left lint fuzzies all through the epoxy coating. Also, you often have to follow the roller with a bristle or foam brush to release bubbles created by the roller. I had weird results applying epoxy to trim one cold, late evening. It was a follow-up coat and the underlying coat was still tacky. The next day it didn't have the usual glossy clear appearance, but a matte, crackly look. A friend told me that he thought it got down to freezing later that night. Just to be safe I sanded it down and applied another coat. Some resources -- System Three in particular -- suggest not doing the initial epoxy-on-fiberglass coat while the temperature is increasing, as this may cause air expansion in the wood and subsequent bubbles (the exception being if you've already thoroughly sealed the wood). Others purposefully increase the temperature in the room after application to try to accelerate curing (while others reduce to the temperature to avoid bubbles). Some suggest avoiding applying any epoxy if you anticipate heavy, condensing humidity before the epoxy will substantially cure. Silvertip epoxy will blush (turn whitish) if exposed to moisture before it has set firm. Some others need a substantial amount of time -- days or weeks -- before exposure. I ran into problems when the wind kicked up while applying a final epoxy coat outdoors, which blew dust and chips onto the surface of the boat (it wasn't a big deal, as I still had some sanding to do). In any event, keep an eye on it for at least an hour after the first epoxy coat on the fiberglass or you may be sorry. |
My first attempt at fiberglassing went really well... for awhile. We were happy with how it looked, and so went to lunch. When I returned, bubbles had appeared all over the place, and the fiberglass had ripples all through it. It looked horrible, and the epoxy was too-far cured to do anything about it. If there were just a handful of bubbles, some recommend slitting them with a razor or injecting epoxy directly into them with a needle. Because there were so many, I sanded it all down, applied another sheet (which went much better), and then a few filler coats. The result was a glossy egg-shell-texture feel. It will be sanded again later to get a smooth surface.
That first epoxy-on-fiberglass application took a lot of epoxy; about 10 cups of resin and 5 of hardener if I recall (two batches of half that size). This was all spread on, and about half of that actually ended up in the trash because it came back off during the squeegee process. At times I attempted to reuse the epoxy instead of making more. That was a mistake. Once applied, it picks up a lot of microscopic airbubbles from the fiberglass ("entrained" air). If you look really closely -- and you probably wouldn't notice it unless it was pointed out -- you can see areas on my finish that look a little lighter, less clear, than nearby ones. That is a result of this reused epoxy. This isn't a problem on the filler coats, which take much less epoxy than the first coat. Perhaps a third as much. But that first epoxy-on-fiberglass coating is a critical, don't skimp and don't mess around, step.
It was painful to see that much epoxy get squeegeed off and dumped out, but I don't see a better solution unless you have a vacuum bell, very slow setting epoxy, and don't mind debubbling it. Doing so might save as much as a gallon of epoxy and hardener over the whole project (~$80). Also, squeegees and mixing bowls are really cheap -- tens of cents -- compared to the time it takes to clean them. I found it easier (and better for my mental health) to just go purchase a dozen squeegees and mixing bowls at 40 cents each after wasting time trying to clean used ones a couple times.
Once the outer hull is complete, the forms were knocked out and the canoe was turned over. I made simple slings from 2x4s and carpet scraps to support the canoe on top of the strongback. Scraped and sanded the inside. Smoothing the inside was much more difficult due to its concave shape. A portable grinder held at various angles really accelerated this step; use abrasive disks commonly used to remove rust or paint. As with a belt sander, never let the tool stop moving side to side while spinning and in contact with the wood.


Without the interior fiberglass and supporting rails and thwarts, the canoe sags somewhat now that it is off of the forms. You need to watch this while doing the interior fiberglass and rails, adjusting the support slings and adding spanning clamps to correct the shape. Otherise, you'll epoxy the deformation into your finished boat.
Applied the sealing/filler coat of epoxy. This filler step not only fills any remaining cracks, but also reveals problems that would be disasters if they weren't caught before the fiberglass went on. For example, I tried a new sandpaper on the inner hull surface, and there was an odd grit or something that scratched up the interior surface. I couldn't see it on the dry wood, but when the filler epoxy went on, it showed up immediately (and loudly), and required additional sanding to fix. If I had proceeded immediately to fiberglassing, I'd have lost my sheet of fiberglass if I wanted to do anything about the marks.
Then apply the fiberglass sheet as with the outside. I found it best to pre-cut the sheet to fit, held in place by a few spring clamps, which were removed as the epoxy was applied. A few bubbles and ripples appeared, but not as bad as the first sheet on the outside. The bubbles formed primarily along the seams between the strips. I assume this was from not having a completely-cured (or thick) sealer coat, and so gas was being pushed through from inside the wood and seams by the hydraulic pressure of the epoxy penetrating elsewhere. It worked fine to just go back over them with a squeegee and sometimes a little more epoxy. Did a light filler coat, leaving a little fabric texture visible for traction.
Moved the whole project to my back yard because the McMinnville Planning Department was having a major hissie fit about there being a tent in my driveway. I didn't violate any ordinance, but Doug Montgomery and Ron Pomeroy said they would cite me anyway, even though they knew I wasn't actually violating any ordinance. They said that this was just how they had always done things. Anyway, I didn't want to have to pay for an attorney to defend myself from frivolous prosecution regarding a tent I had always planned to move anyway, so after two months of harassment and threats from them I gave into their extortion. But that is another story for another time.
Creating the rails required epoxying three eight-foot lengths together for each rail using a 6-to-1 scarf joint (some recommend 8-to-1 or greater, but the 6-to-1 ratio worked fine for me). Then cut them down to length, test fit, and sanded the surfaces where they would attach to the canoe. The gluing points need to be roughed up in advance because the epoxy does not adhere well to glossy, hard surfaces (like already-cured epoxy). Did some prep-work to try to keep the surface clean (blue tape), and then epoxied them into place.
Sand the surface to which the rail will attach...


It will save a bit of work if you peel off the blue tape while the epoxy is still wet. Then go through and apply clamps every 3-6 inches. My purpose in using so many clamps isn't to apply a huge amount of pressure to the joint -- you'll notice I have no C-clamps on the rails that might starve an epoxy joint -- but to just keep the rail and hull uniformly against each other.
Ended up doing one outer rail at a time because it took pretty much every clamp I own. It is good to have an extra set of hands around for items like this, but an individual can do the rails if you dry clamp them in place first with a tight clamp every couple feet. Then remove the clamps from the middle to one end and apply your epoxy. Clamp that half firmly in place and remove the clamps on the other end; wash, rinse, repeat....


The interior rail was dry-set into place first, then marked off for thwarts, seats, etc. At first I thought I'd use mortise and tenon joints for the thwarts, and threaded rod hangers for the seats. Anyone who has seen my other projects knows that my tendency is to overdesign and overbuild things. I don't like the idea of one coarse threaded bolt in a 3/4 inch teak rail trying to support up to 200 pounds if someone steps on a seat funny. Also, wood does not resist outward pressure very well over the long-term; it tends to split and fail. Consequently, I plan to add full ribs at the seat points and will hang the seats from ribs. Like the thwarts, this will also prevent the seat from puncturing the hull under compression.
To scupper or not to scupper: Scuppers/ports serve an important purpose on large boats with decks, allowing water to wash off the deck in heavy seas and rains. They are also the natural result on a canoe that is made with ribs. However, on small, ribless boats with open hulls, whether their utility matches the effort needed to make them is debatable. They do make easy tie-down points for small lines, and water drainage when rinsing out the boat on land. Other than that, they are just a lot of work to make and maintain, so I put solid rails on this one.
One of the inner rails snapped at a subtle knot during installation -- another quarter for the swearbox. It was really my own fault for allowing too much stress to focus right on the knot during installation. I cut out the snapped knot with the scarf joint jig, epoxied the rail back together, and was able to (re)install the rail the next day.

The thwarts and yoke were then rough cut from teak using the band saw, shaped with a wood rasp, and hand sanded. For both overall strength and appearance, I used oak dowels in the joints (instead of metal hardware) to attach them directly to and in the same plane as the inwales. The dowels are very snug, but the meeting faces between the ends of the thwarts and the inwales aren't perfect -- another good point for epoxy.
Installed the thwarts and allow the canoe to settle into its final shape over a couple days. The side walls had sagged outward since coming off of the forms. The thwarts pulled them in a few inches. Some people seem to get a little excited over precision in these and similar steps. But the truth is that, on an 18' boat, a few 32nds of an inch in width or sheer height don't make any perceptible difference whatsoever.

Some makers have commented about thwarts and seats getting rammed through the hull walls during compression, so all such components have been designed on my build so that cannot happen. For example, the thwarts are level with and blend directly into the inner rails (mortise and tenon, dowel and biscuit joints will do), and the seats butt up against and are supported by vertical ribs instead of hanging from the rails. This way, none of the internal components are in a place where they are likely to pop through the hull in the event of a side compression.
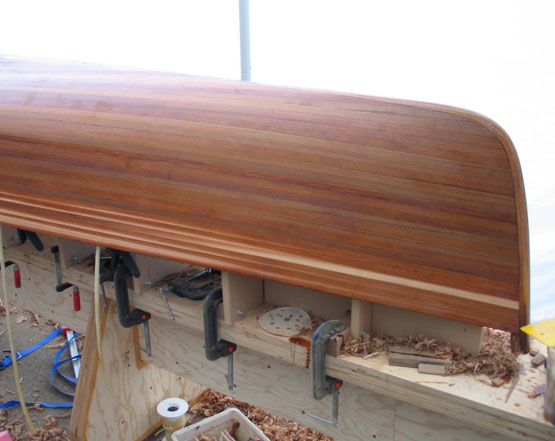
Chiseled, planed and sanded the ends at the sheerlines in preparation for the endcaps. I don't care for the appearance of the stems' endgrain showing though, so have designed the endcaps to go over the top of the stems and rails.
The "decks" -- or what I am calling endcaps, since "deck" really doesn't apply to them -- are teak, too. Hand carved to blend into the overall shape and rails. The ends of the outer rails were curved up above the sheer line during installation, and the excess planed off so they could mate up with the caps. Installation was a little more frustrating than I hoped. I roughed in the curved top side of the caps before epoxying them in place. It would have been easier to clamp it if I had left the top square, glued it in place, then shaped the cap while on the boat. The clamps couldn't get a good grip on the curved surface and tended to slip off.

These caps serve an aesthetic purpose and act as a grab-point for lugging the canoe. But they were a bit of a pain to make. I'm thinking about alternatives on the next canoe. Now that these are on, it "looks" almost finished. I have mixed feelings about that. On one hand, it is a relief and exciting because I look forward to taking it out; but on the other, I have really enjoyed making it -- it has been fun to do a little on it each day -- and don't want that to end. Weird. What this all means is that I have been purposefully stretching it out here towards the end.

Rounded the edges of the rails and blended them in with the thwarts and caps and began finish sanding in preparation for a final light coat of epoxy, then varnish.
Finally burned up the brushes on my Dewalt orbital sanders (after a few years of heavy use). Replacement brushes were cheap, but I also used it as an excuse to purchase a couple reconditioned sanders from one of my favorite tool companies, Ridgid. The Dewalt ones have been fine, with only a few complaints. Their dust bags are held on by a friction-fit o-ring and sometimes they fall off. They seem to me to be noisier and have more vibration. I've had to replace several hook and loop pads and speed brakes, too. But they were also better at collecting and trapping dust than the equivalent Ridgid models. I don't know that I could say one actual sands better than the other.
The quality of any completed wood project is the combination of several factors: good original design, quality materials, accurate construction, surface preparation and final finishing. Rush or skimp in any area, and it will remind you of it for the next several years. One place where this has been painfully evident to me on this project is in the preparation for varnishing. For everything else I make I usually use a penetrating Danish Oil finish; the key to any oil finish is prior surface preparation because any imperfections are amplified when the oil goes on. It isn't quite the same when applying varnish to an already-glossy epoxy shell, but there is a similar principle: The finish isn't going to look any smoother or nicer than the surface to which it is being applied. The outer hull surface had an egg-shell-like (some would call it "orange peel") texture to it by the time I completed filling the fiberglass, along with a few runs and sags. To get a top-quality looking finish, this must be sanded down completely smooth (I used 100-120 grit), wash that clean, then apply another thin layer of epoxy to seal any exposed fiberglass. Wait for that to cure, then sand very lightly with 200-300 grit prior to varnish application.
Sand this...

... until it looks like this:

... then add a thin coat of epoxy, lightly sand again, then varnish.
Some sanding is always going to be necessary at this point (just prior to varnishing). But subtle irregularities alluded to earlier in the strip layup pretty much doubled the sanding time. The 6" Ridgid sander I ordered really helped.
November was upon me before getting the varnish on. Living in Northwest Oregon, winters are a randomly blustery, humid, and temperatures swing between 20 and 60 degrees in a 24 hour period. A perfect day will be followed by a rapid chill and condensing fog, destroying any epoxy laid on that hasn't yet cured. This has wreaked havoc with my latest epoxy attempts and I don't want to risk the varnish work. So I am pausing work on the canoe to make a greenhouse-like building area in my back yard with temperature and humidity controls.
Summer again, and time to get this finished. I coated the outside and trim with several layers of System 3 gloss marine varnish. Had a little trouble with runs and coagulation between coats, but it worked out. I found that it worked best to put a thinned coat over a freshly-sanded surface, wait 6+ hours, hit it with steel wool or a 3M substitute, and apply a second, thick coat with a good bristle brush. Applying the second coat too soon, or using a foam brush to do it, resulted in a nasty surface that had to be sanded.

For tie-down points I used brass rope straps from Jamestown Distributors. These are screwed directly into the stems for strength. Some makers seem to prefer to drill a hole through the canoe siding and use a brass tube insert or the like. I thought about that -- and actually purchased the bronze tube to do it -- then decided against it, realizing that my hardwood stems are much stronger than the siding, anyway.
Coated the inside with several coats of Epifanes matte varnish. Compared to the System 3 varnish, this was practically a gel, and being a matte finish, it went on much easier (but I should add that it did not adhere as well as the exterior varnish -- I noticed a little peeling away at places after several outings).


Note that I haven't installed any seats. No, I didn't forget. I decided to hold off on them and make a kneeling stool instead. Still have to try it out on the water, but I hope that it will be more comfortable than common canoe seats or kneeling in the bottom of the boat. If it doesn't work out, I can always install fixed seats later.

Some pictures with the kids on our first outing:


Follow-up
The canoe is a little unwieldy to carry for long distances, or load and unload by myself. It is also too large for me to handle on the water by myself if there is a strong current or wind; either situation requires two good paddlers. I also suspect that I introduced a little too much rocker into the hull during fiberglassing. However, these things aside, it is a lot of fun to paddle, and both the kids and I really enjoyed it, and spent many hours on the water during our recent vacation.
I actually had all five kids in the boat for couple of the trips and it handled great. They loved paddling. At first I was going to make paddles, but ran out of time. It took awhile to find properly sized ones. The handle length should be roughly the vertical distance from your shoulder to the waterline, assuming you are sitting in the boat (obviously), then add the paddle blade.
Some sharp rocks really scratched up the underside of the hull, but that's life. And the kneeling seat turned out great; neither my knees or back were the slightest bit tired or sore even after hours of paddling without a break. The boat was pretty stable as long as weight is kept low; I paddled standing up several times without any problem.
Lots of comments, questions and stares from others as they saw it (which probably isn't too good for my ego).
Next I plan to make a smaller one that can be handled by a single adult or two kids.
Useful Vendors
Shipping turned out to be a big chunk of the expense on this project. All other things being equal, you'll often save money by buying as close to you as possible, but these are the vendors that I used for a lot of the epoxy, fiberglass and unique tooling that can't be found in my own town.
- Noah's Marine Supply out of Canada for initial fiberglass, epoxy and application tools order. An excellent all-around small boat supply center, they also provide small boat kits and pre-made forms. They are a little more expensive for products plus shipping due to the distance.
- Infinity Composites (Infinity FRP Supply) out of Ohio for follow-up fiberglass and application tools. They had the best price I could find on 60" 6 oz fiberglass and took good care of our order. But they don't carry System Three products, so I had to keep on looking for another source, which led to....
- Fiberglass Supply out of Bingen, WA for fiberglass, epoxy and application tools. They are right next to where I grew up (the thriving metropolis of The Dalles, OR) and close enough to me that I was able to save a bit on shipping by purchasing from them. They probably carry anything and everything you could ever need for fiberglass application. Some mix-ups with orders and shipments, but they always made it right in the end.
- Jamestown Distributors out of Rhode Island. I purchased the brass hardware and Epifanes varnish from them. Speedy service.
- Cummins Tool Supply. I normally don't care for the company (I'm kind of snooty when it comes to quality tools), but got a good price on the reconditioned Ridgid sanders there, so figured I should mention them.
- (GI) Joes for life jackets for the family. They had a good sale going and I got decent ones for $10 each.